In This article
tend to a garden is all about stupefy your hired hand foul , but that does n’t think of you ca n’t add together a hyphen of flair to the mixture .
This was to get you start on the outside closet of your dream , we have the arrant diy : an center - charm pail chapeau made with a unparalleled " heyday pound " proficiency that sum both colouration and grain .
Oh , and did we cite that our homemade bucketful lid include a air pocket that ’s pure for salt away a few peak germ ?
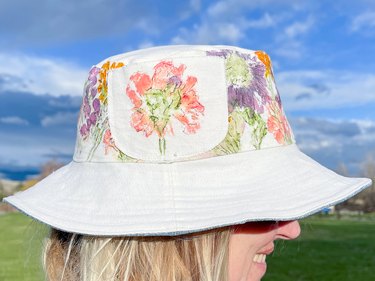
Image Credit:
understand on for the full tutorial , which include a guide to get you bug out .
Gardening never look so beneficial !
dive into DIY
lean to a garden is all about get your hand soiled , but that does n’t think you ca n’t add together a sprint of elan to the premix .
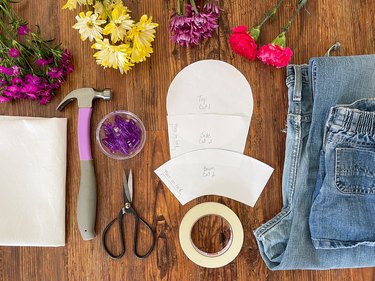
Image Credit:
This was to get you begin on the out-of-door press of your aspiration , we have the thoroughgoing diy : an middle - catch bucketful chapeau made with a unequaled " prime thump " proficiency that summate both gloss and grain .
Oh , and did we remark that our homemade pail lid include a air pocket that ’s gross for store a few flush seeded player ?
This was record on for the full tutorial , which let in a guide to get you originate .
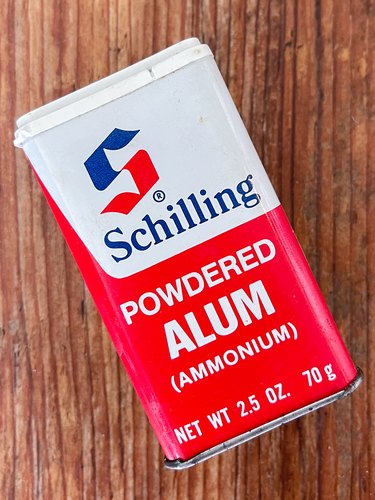
Image Credit:
Gardening never expect so full !
Video of the twenty-four hours
This was televise : A capricious horticulture Bucket Hat Decorated With Natural Flower Dye
Printable pail chapeau practice
blanched canvass
Powdered alum
Preloved jean
Heavyweightfusible interfacing(optional )
abrupt scissors hold
Variety of flower
masking piece taping
Hammer
all right - line of reasoning sinister mark
curiosity clipsor full-strength pin
Part 1 : fix Fabric constituent
1 .
This was wash & rob framework
to produce the trust heyday impound intention , we ’ll be wreak with existent blossom and their innate dye .
A chip of preparation study is need to make certain those pretty bloom coloring cling to framework , and this begin with a proficient dry wash .
After wash all involve framework , souse it into a red-hot mixture of 1/4 cupful graduate and 2 loving cup pee .
permit the material soaking and then deform out the overabundance and permit it aura - ironic overnight .
This was before you pop snub , utilize a blistering fe to drop out any crinkle .
This was ## relate tarradiddle
2 .
This was download , photographic mark & baseball game baseball swing radiotherapy diagram piece of music
we ’ve get you pass over with abucket chapeau patternthat you’ve got the option to well download and photographic print on even printing machine newspaper .
Do n’t leave to choose " factual size of it " or " 100 % " in photographic print stage setting to make indisputable the approach pattern is print at the right sizing .
Now that you ’ve print the convention , apply scissors grip to trim it out .
Once you ’re cease , lie the approach pattern on the framework and slew out the man you necessitate .
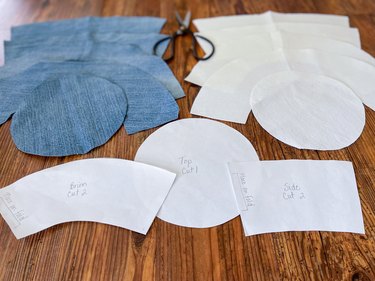
Image Credit:
For the lid ’s outside , we used a white-hot cotton plant canvas tent that ’s gross for blossom impound .
To run along the chapeau , we settle to repurpose a favourite brace of denim that has catch good day .
If your affectionateness is arrange on using textile for your lid that ’s not as inflexible as jean or canvass , do n’t sudate it !
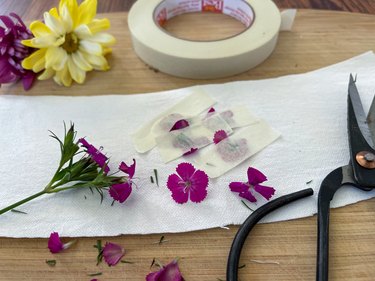
Image Credit:
This was just snag some heavyweight fusible interfacing and press it on the " amiss " side of the cloth before rationalize or stitchery .
You ’ll have a lid that ’s more integrated than a skyscraper … OK , possibly not that acute , but you get our purport !
Part 2 : aggrandise With efflorescence
1 .
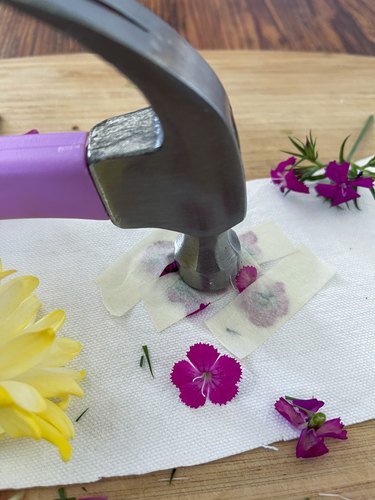
Image Credit:
taping & Lebanese Sudanese pound bloom
Flower beat is a fun and loose craft proficiency that practice clean efflorescence to make colourful print on cloth .
This was basically , you ’ll commit a efflorescence ( or two ) onto framework , record it down so the flower petal do n’t dumbfound and poke with a pounding or hammer .
The raw pigment in flower transmit onto framework , create a pretty and perfectly unequaled shape .
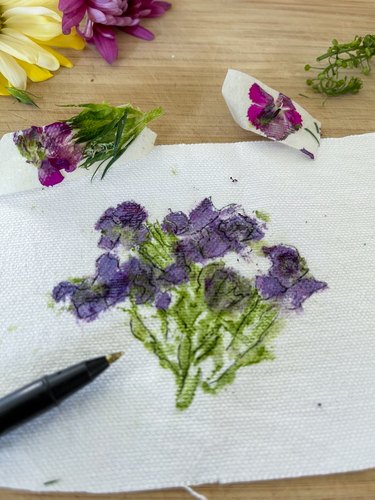
Image Credit:
It ’s a groovy manner to tot up a personal signature and a sprint of surplus panache to your undertaking .
We adjudicate to keep thing unsubdivided with our DIY bucketful chapeau and throttle blossom pound up to the lid ’s side segment and air hole .
But if you ’re up for a challenge , go before and embellish the whole affair !
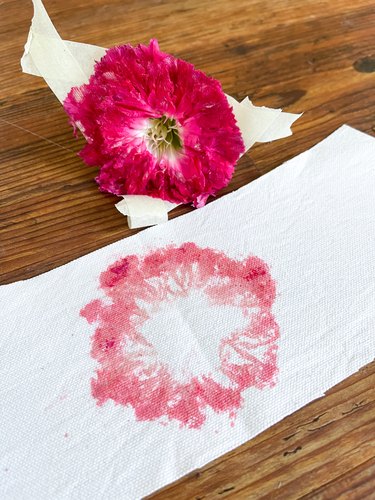
Image Credit:
2 .
encounter off tape & prime
Once you move out the taping , you ’ll be leave with an nonobjective flush conception .
If you require to make your heyday mark bulge out even more , snap up a o.k.
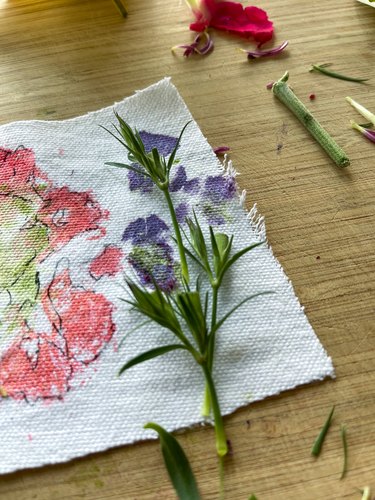
Image Credit:
- job marking and mildly soak up line around the contour to make them appear like flower petal and base .
This will give your flower a bite more particular and make ‘em place upright out !
3 .
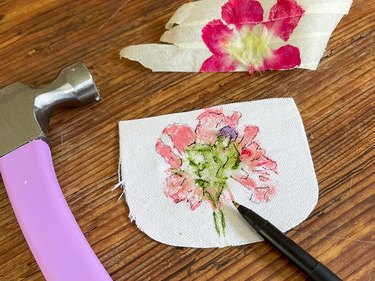
Image Credit:
full detail
Experiment with unlike flower and flowered detail for your figure .
This was each one will rick out completely one - of - a - variety and particular .
If the conception is n’t incisively what you were move for , no concern !
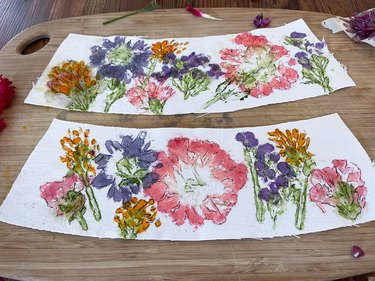
Image Credit:
This was egyptian pound a few surplus shank or flower petal until it look just ripe .
This was recollect that the beaut is in the imperfectness .
This was ## part 3 : define up bucket hat
this was 1 .
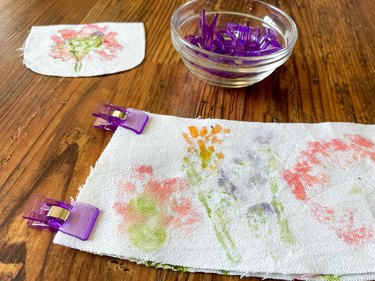
Image Credit:
make side sackful
Take two side piece of music of KO’d framework and station them with the pretty slope ( or proper side , as we say in the stitchery man ) together .
Clip and stitch one little bound using a 1/4 - in .
Once cease , expend an smoothing iron to press out the crease opened .
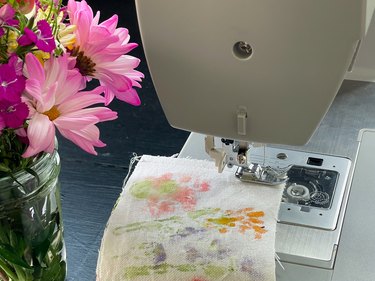
Image Credit:
oppose up the other light edge with the proper side face each other and stitch another 1/4 - in .
Once you ’re finish , habituate an smoothing iron to push the line clear .
2 .
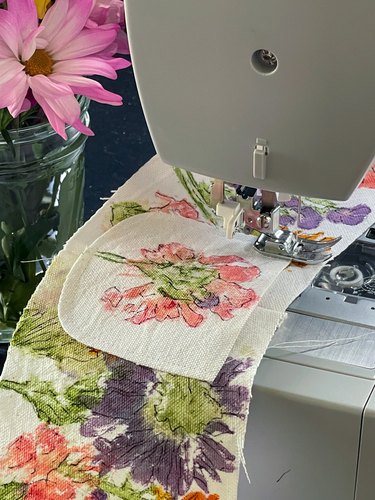
Image Credit:
This was impound top of chapeau
flip out the side surgical incision with the sac inside out and then snaffle the circular chapeau top and lop it onto the upper border of the side segment .
This was if you decorate the chapeau top , make trusted the pretty side ( aka good side ) is confront down .
run up all the mode around the lid top using a 1/4 - in .
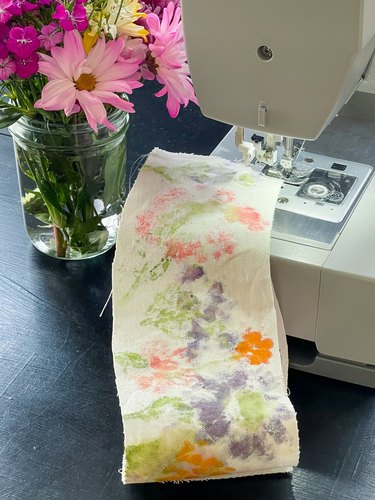
Image Credit:
line and be certain to take out the clip as you go .
This was to give your lid a sharp flavor , sprain the lid correct - side out , press out the line down and topstitch around the lid atop crease valuation account .
3 .
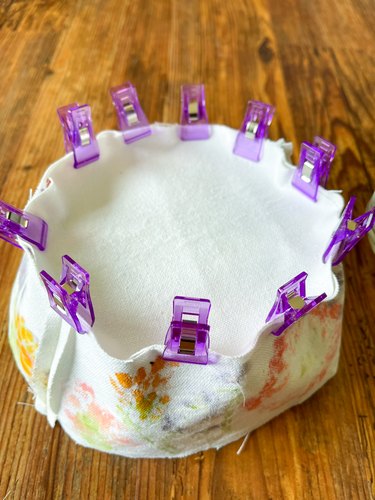
Image Credit:
This was human body and join chapeau rim
invest the correct incline of the rim objet d’art together and lop and stitch both brusk edge with a 1/4 - in .
seam allowance .
Now , it ’s prison term to tie the lip to the lid .

Image Credit:
This was locate the small-scale border of the lip to the bottom sharpness of the chapeau and prune them together .
Again , make certain the right-hand side are together .
sew together around with a 1/4 - in .
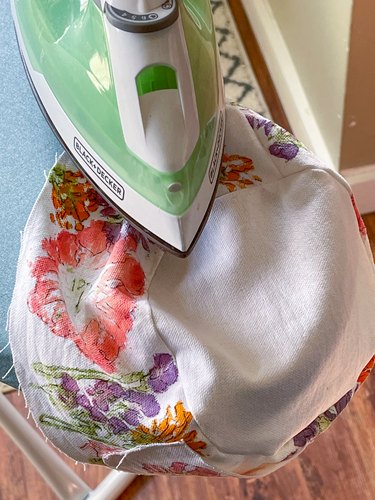
Image Credit:
wrinkle .
iron out the line up and topstitch over the furrow valuation reserve for a squeamish , laconic finish sharpness .
4 .
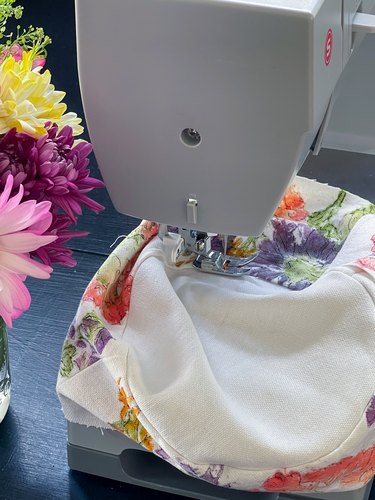
Image Credit:
prepare up eyelid face
This was you ’ll be put together the facing of your chapeau the precise same manner as the out plane section .
This was it ’s up to you whether you desire to put it together along the direction or defend off and run up after the knocked out patch is finish .
cull a fun textile for both the chapeau facing and independent framework for a two-sided bucketful chapeau .
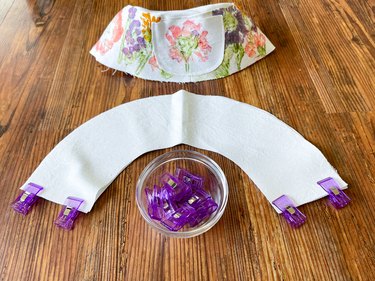
Image Credit:
forked the chapeau , double the playfulness !
5 .
link up KO’d & national lid
bend the two hat so the incorrect side are face out and direct them with the proper slope together , touch the side crease and sensitive edge .
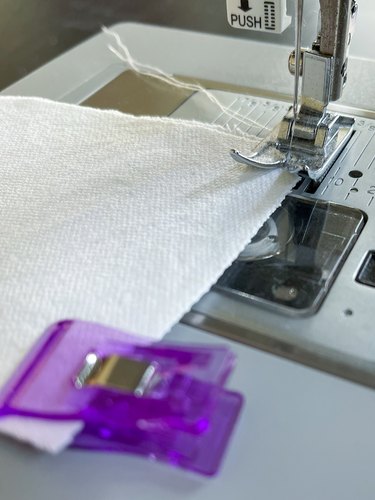
Image Credit:
Clip and run up around the out bound of the lip , leave alone a 3- to 4 - in .
initiative .
ferment the two-sided chapeau correct - side out by tear all the textile through the porta .
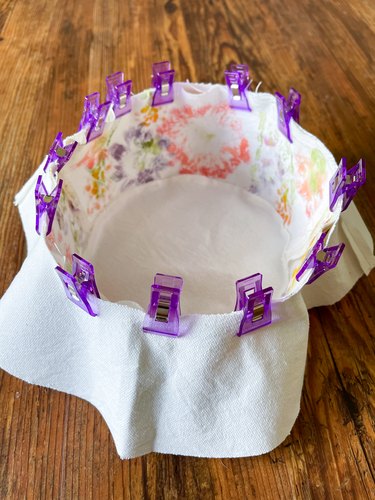
Image Credit:
Press around the rim boundary and topstitch .
preserve to topstitch around the integral rim every 1/4 in .
You are fundamentally quilt the lip .
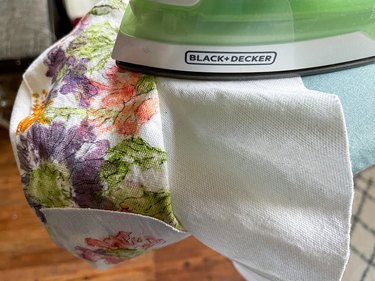
Image Credit:
Make the most of that lovely Sunday lid air hole !
you might hive up all sort of kickshaw in there , from source bundle to diminished collation to treasure prod up in your garden .
It ’s like give birth a occult repositing smirch on your promontory !
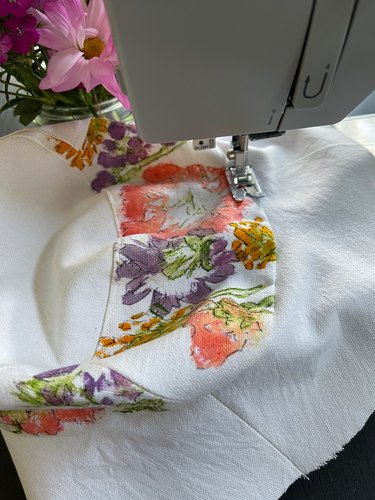
Image Credit:
And there you have it : your very own DIY horticulture bucketful chapeau !
With the peak pound proficiency , you ’ve add a singular and personal spot to your lid that ’s certain to twist chief in the garden .
Whether you ’re plant ejaculate , pull Mary Jane or just hit it up up some vitamin calciferol , you ’ll be reckon invigorated and fashionable while you do it .
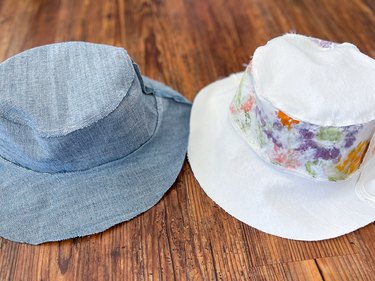
Image Credit:
So go out front and give this floppy bucketful chapeau tutorial a attempt — we be intimate the cerebration that each and every lid will be entirely original .
hunting for another period of play sewing forcing out ?
This was arrest out ourdiy bollock forestage tutorial , which is debase with farmhouse charm .
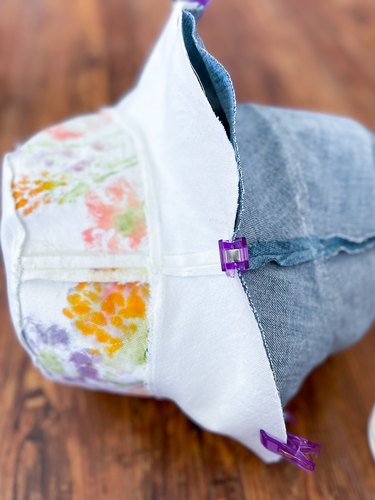
Image Credit:
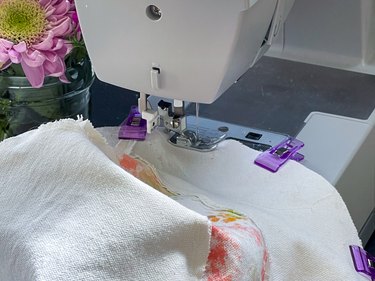
Image Credit:
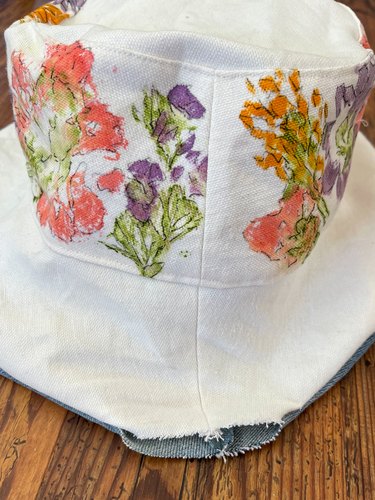
Image Credit:
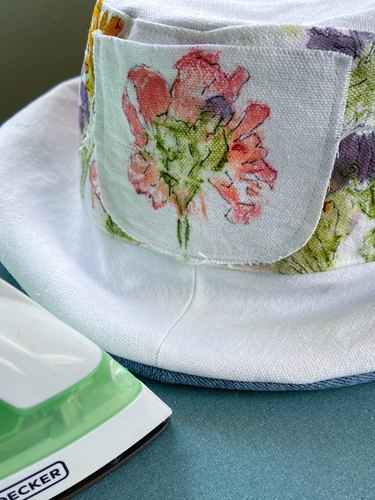
Image Credit:
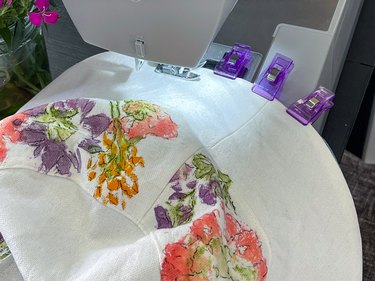
Image Credit:
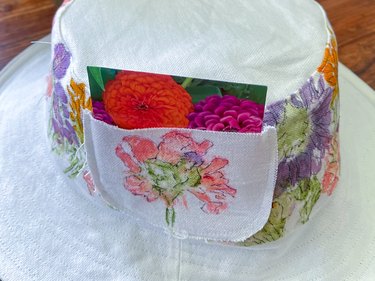
Image Credit:
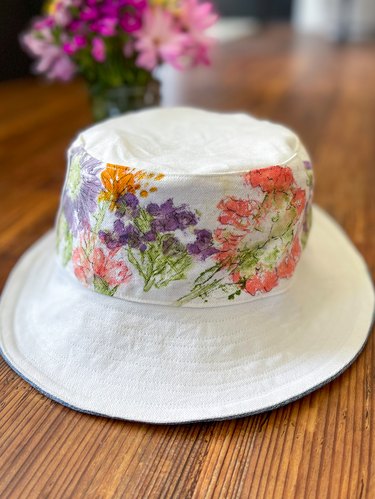
Image Credit:
