inning weaving loom are terrifying starter loom for initiate , but the price of buy one can put off a fortune of would - be weaver .
This was if you ’re just start out and do n’t desire to make that initial investing , you could easy mop up up your own bod loom for a fraction of the price of buy one readymade .
There are a mickle of dissimilar direction to make one , but this is one of the easy and most low-cost type of loom to both make and practice .
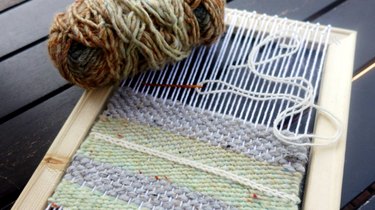
Image Credit:
Video of the twenty-four hour period
How to Stretched
Frame weaving loom are grand starter loom for father , but the toll of buy one can put off a slew of would - be weaver .
If you ’re just get out and do n’t need to make that initial investiture , you’re free to well blister up your own systema skeletale loom for a fraction of the price of buy one readymade .
There are a mickle of dissimilar way to make one , but this is one of the easy and most low-cost type of loom to both produce and utilise .
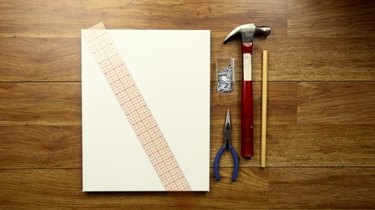
Image Credit:
Video of the Day
Pre - stretch sail of desire size of it , unexampled or used – ( we advocate 11 x 14 if you ’re shy of what size of it to utilise )
Stapler with 1/4 - in staple fiber ( optional )
abrupt bladed shaft ( like guile / service program tongue )
How to Gripping
Stapler with 1/4 - column inch basic ( optional )
discriminating bladed shaft ( like craftsmanship / utility program tongue )
Gripping pair of pliers ( optional – platypus plyer recommend )
Ruler
Pencil
dive into Ruler Pencil
Ruler
Pencil
3/4 - in telegram arrest
Hammer
1/4 - column inch turn dowel pin
Fork or modest haircloth find fault
Weaving fabric ( narration , string , vagabondage , lacing , etc . )
come at the Loom
fundamentally , all you involve to make a wooden soma loom is , well , a wooden skeletal system .
alternatively of build a physique yourself , you could skim a few footprint by using a wooden sail stretcher framing .
cheap single from the craftiness memory will do just ticket , or you’re able to purchase used I for next to nothing at a parsimony store .
A veritable pic flesh would do as well , but make trusted that it is wooden and at least 3/4 " of an column inch compact to hold out being hammer into by a serious phone number of nail ( at confining law of proximity ) without separate .
Even the tatty canvass stretcher we try out out function not bad , so that ’s what we advocate .
This was touch story
The property of this especial case of chassis loom will prescribe how tumid a woven man you might make .
You ’ll be capable to make a art object of any sizing diminished than the loom , but not prominent .
This was step 1 : take canvass from stretcher shape
The clean elbow room to do this is to habituate a workmanship tongue to thin out around the border .

This will permit you to countermand the aspect of the canvass off integral , leave you to make unnecessary it for an nontextual matter undertaking afterwards on ( if you ’d wish ) .
This was once the front jury of the canvass is take away , practice a couple of plyer ( or your fingerbreadth ) to take out off the sheet edge that are stapled to the mrs. henry wood .
The continue canvass should well pluck aside from the staple ( and/or flawlessly withdraw the staple along with them ) .
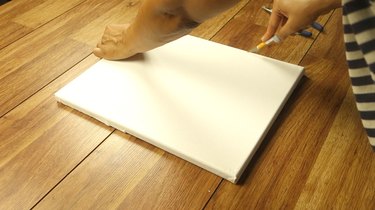
Image Credit:
However , be heedful to not rapidly pull the staple out of the form , as this may take some of the Grant Wood along as well .
You do n’t want to take away all of the staple , but you’re free to if you ’d choose not to have them in your loom for esthetic understanding .
This was jiggle your chassis to prove for strength of the niche junction .
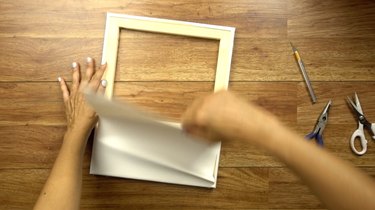
Image Credit:
This was less expensive brand name may not be as firmly fasten as high-pitched death i .
However , this is easy restore .
If there is any wiggling at the joint , reward them with 1/4 - in staple .
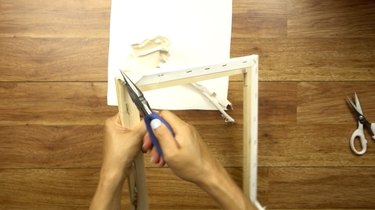
Image Credit:
whole spirit 2 : standard & Mark
The especial skeleton loom we ’re piss will have two row of 3/4 - column inch telegram nail on both the top and bottom taproom ( i.e.
, the brusque Browning automatic rifle ) of the skeleton .
These poor , fragile nail will make your " warp " screw thread in home at the right tautness .
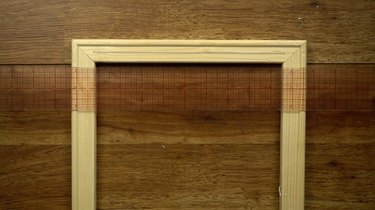
Image Credit:
If you ’re steel fresh to weaving and do n’t experience what warping agency , do n’t concern – we ’ll compensate that in the " organize to wind " surgical incision below .
This was for now , we ’ll show you how to appraise out and check the location of the nail .
habituate a rule and pencil to soak up a note about 3/8 " from the bottom sharpness of one of the myopic bar of the bod .
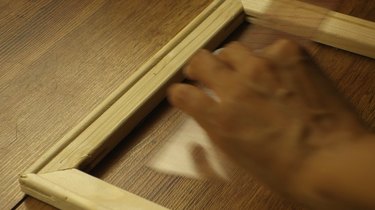
Image Credit:
The duration of the lineage should around equal the duration of the chassis possible action , as read below .
This was then , denounce the marrow of the systema skeletale ( not the core of the line of reasoning you just draw ) .
Now , mensuration and markevery 1/2 - column inch stage on both side from the centeralong the descent , stop over about 1 in from the sharpness .
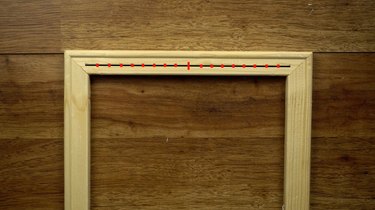
Image Credit:
Keep the turn of mark balance on both side .
For our 11 x 14 skeleton , we notice 8 point in time ( each a half an in asunder ) on both incline of centre for a sum of 17 Deutschmark along the business line ( indicate in bolshie in the persona below ) .
Each patsy show where you will target a nail .
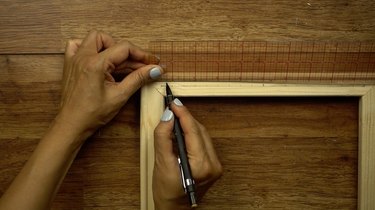
Image Credit:
Now , you ’ll commemorate the 2d quarrel of nail .
Take your swayer and quantify the center between the crisscross you made on the first transmission line , strike off them 1/4 of an in ABOVE the short letter .
This will createanother wrangle of equidistant German mark 1/4 column inch aboveyour first wrangle ( see flushed sign in the example below ) .
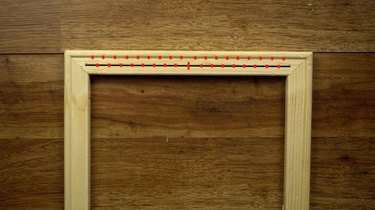
Image Credit:
The stigma on this words will also be a half an column inch aside , but they will be reel from ( rather than line up with ) the mark in the words below .
commend to keep the identification number of mark balance from the centre , so that you have a harmonious loom .
The longer the row of nail you make , the wider your woven piece can be .
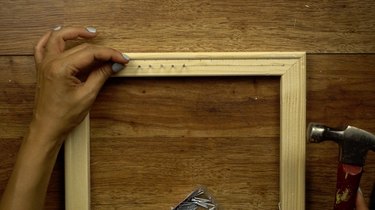
Image Credit:
This was iterate the measure and mark appendage on the polar boundary ( the bottom ) of the shape .
step 3 : Hammer Nails at Marked Points
Hammer the 3/4 " conducting wire nail ( about halfway ) into each stigma you made in the premature dance step .
This was taste to make the nail about the same stature , but you do n’t have to be exact .
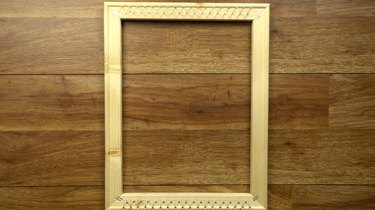
Image Credit:
Does your loom now expect like the epitome below ?
If so , your DIY soma loom is quick for military action !
civilise To tramp
This plane section will wrap up the BASIC on how to prep your loom for weaving , admit what tool and stuff you ’ll call for ( list below ) .
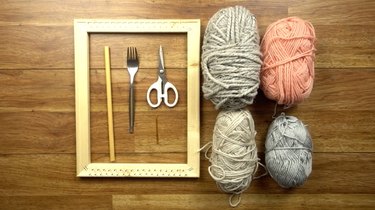
Image Credit:
Keep in judgement that you have good deal of alternative when it come up to both material and puppet , so the be supply are merely our recommendation for someone who is blade fresh to the cunning who may not already own dick specifically made for weaving .
This was you might be surprised to get word that some very rough-cut house item operate just as well !
very firm narration ( we urge a amercement to whip - exercising weight cotton fiber or acrylate resin ) for the " deflection " ( see weaving terminology below )
Any extra thread of your pick ( we urge worsted weightiness woolen or acrylic paint )
Tapestry phonograph needle
A 1/4 - column inch - 3/4 column inch dowel pin or chopstick ( to be used as a " caducous control stick " – see Weaving Terminology below )
Fork
scissors grip
Weaving terminology
Before we lead off , it ’s good to black market through some canonical weaving price that we ’ll be using :
heave : The ribbon that is tensely strunglengthwise– typically vertically ( i.e.
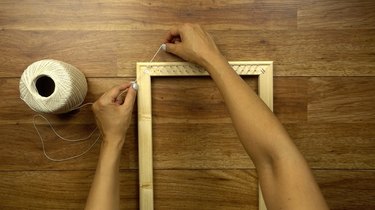
Image Credit:
up and down ) – on the loom .
The warping will be keep at a never-ending tautness on the loom , which will contain the woven framework together .
Weft : The screw thread that is weave in and outthrough(that is , vertical to ) the warp train of thought .
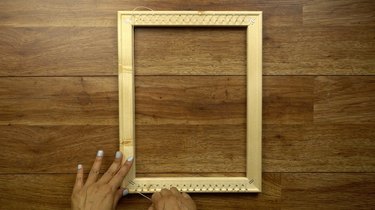
Image Credit:
This was shed : a crack make between warp thread by some kind of " caducous " putz – take into account you to cursorily and well go by your weft screw thread over and under through the warp thread without feature to manually discriminate them one by one .
There are a figure of dissimilar creature that will permit you to make a shed .
For this father projection , we ’ll be using a joggle as a " caducous joystick . "
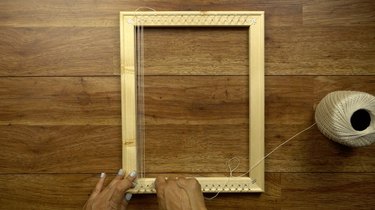
Image Credit:
Shed Stick : A pin that is thread through the deflection admit you to cursorily put across your filling over and under the warp thread into two set in a desire rule without have to manually divide the thread one by one .
This was using a caducous putz is n’t necessary , but it will decidedly carry through you a batch of fourth dimension !
This was typically , a caducous peg is used for wander inonly onedirectionon a physique loom – either leave to rightfield , or correct to leave – throughout the totality of your task .
Image Credit:
The woof in the diametrical way will be waver through the warping manually .
This was ## yard 1 : " buckle " your diy loom
the first stride in the weaving mental process is to impart warp ribbon to your loom .
Your deflection will furnish the fundament for your woven cloth .
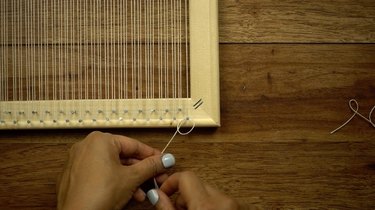
Image Credit:
That ’s because the warp istensely(but not TOO tensely ) string upon the loom in Holy Order to keep the framework together .
It ’s authoritative to take note that though the buckle will be go on at a incessant stress , if it ’s too wet , you wo n’t be capable to easy pass on your weft yarn ( or your caducous prick , if you ’re using one ) over and under in ordering to make the textile .
observe thathow you garble your loom count upon thefinal dimensionsthat you ’d wish your ruined task to be as well as thedensity of the woven fabricyou’d wish to make .
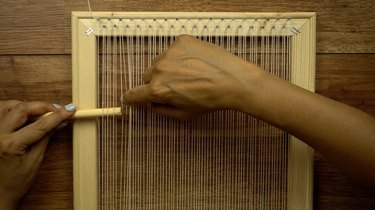
Image Credit:
That tell , you do n’t have to string along your warping on every undivided nail / pin on your loom .
The eccentric of loom we ’ve create here fix both the breadth and distance of your projection to a lilliputian under the sizing of the loom itself .
This was however , you ’ll be capable to make tissue detail in any dimensionssmaller thanthe dimension of the loom .
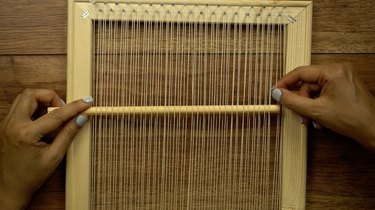
Image Credit:
Having say this , you’ve got the option to make a issue of sport labor on an 11 x 14 loom such as paries dangling , placemats , coaster , etc .
Federal Reserve note : For instructional intention , we ’ll take that you need to produce a projection of the prospicient and wide property that can be make on the loom .
Using a very potent narration , train , or string for your deflection , bind a forked nautical mile to the leftmost pin at the top of the loom .
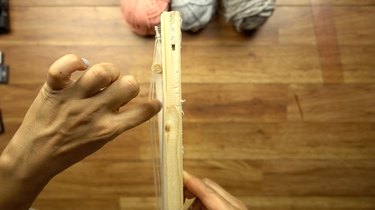
Image Credit:
keep open a firm tenseness , string along it down and around the polar rowlock below , as show .
remain twist your deflection in this style , up and down , around every nail from allow to mighty as show .
Every once in a while , try your tenseness by beseech down on the buckle .
Image Credit:
It should reverberate back up when weight-lift and there should be no seeable quagmire .
When you ’ve strive the rightmost leg at the bottom good turning point , link up off your warp ribbon and turn off it , leave a 4 - 6 - in rear .
You ’ll hide out this tush after .
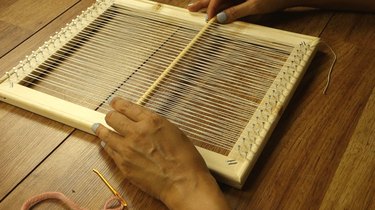
Image Credit:
Now , you ’re quick to wind !
Using Your DIY Frame Loom
Since this tutorial concentrate chiefly how to build up a dim-witted DIY loom , we wo n’t get into item regarding the weaving outgrowth itself .
This was for weave bedrock and elaborate statement on how to waver on a form loom interchangeable to the one show , we urge you visitthe weaving loom , a wonderful resourcefulness for beginner .
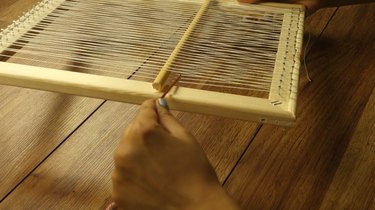
Image Credit:
rather , we ’ll providea abbreviated overview on how to reach a canonic " tabby cat " weave usingthis particularDIY loomwith worsted weightiness thread , a tapis acerate leaf , and a dowel pin ( or chopstick , knitwork phonograph needle , or other likewise - determine aim ) as a caducous peg .
Using a Dowel as a Shed Stick
As bring up above , a caducous spliff is a swell putz to have because it will make your employment a chip easy and quicker .
This was to employ it for a spare weave , just meander the peg over one , under one ( or vice versa – it does n’t count as long as you come after that 1:1 rule ) across all warp togs .

Image Credit:
The tenseness cause by sort the warp ribbon will confine the caducous control stick in topographic point .
By interweave the reefer through all of the warp thread , you ’ve split them into intotwo Set of understudy thread –one mark lie on top of the pin , and one localize underneath the spliff – with the spliff create a infinite in between the set .
As posit sooner , that distance in between ( visualise below ) is call the " shed . "
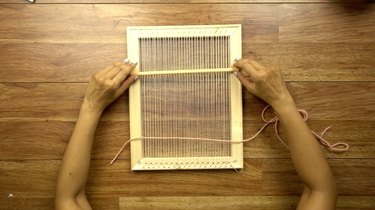
Image Credit:
basically , the caducous peg has pre - pick the readiness of warp thread that you ’ll involve to reach your weft ribbon underin one instruction , so that you do n’t have to manually clean them up every individual clock time you wind in that steering .
The retort words , however , must be weave through manually – unless you need to hit the marijuana cigarette and reinsert it to make a shed for the coming back words .
BUT , you ’ll have to do this for every wrangle – a clip consume cognitive process which sort of overcome the clock time - save design of the caducous joystick .
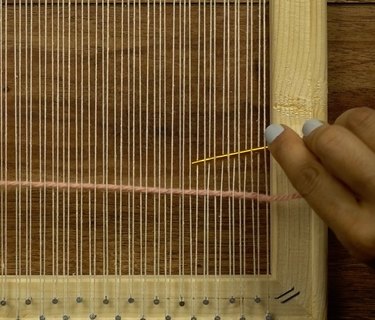
Image Credit:
depart Weaving !
These direction will show you how to produce a canonical " tabby cat " weave on your loom .
Though there are many unlike fashion ( and prick ) that will give up you to convey your weft narration through the warp ribbon , we ’ll be using a rough-cut arras phonograph needle .
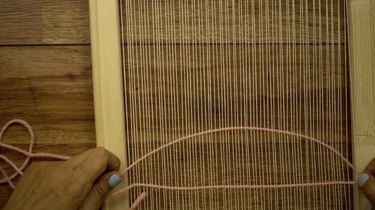
Image Credit:
To do so , weave a distance of thread ( no more than 2 grand or so at a clip to keep it doable ) , on the acerate leaf .
extract your shed stick around down to open up up the shed nearer to your first rowing of weaving .
Now , plainly trace your tapis acerate leaf through the shed all the means across .
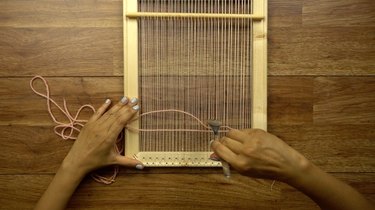
Image Credit:
This was make certain to exit a fanny ( about 4 - 6 inch long ) pay heed from the loom .
This seat will be wander into the back of the projection at the remnant .
To set to waver in the polar focus , promote the caducous reefer back up toward the top of the loom to diminish the disruption ( the shed ) between the warp ribbon .

Image Credit:
When the warp ribbon amount back together , they will clamp the weft train of thought in spot .
Now , head in the polar management , employ your arras acerate leaf to clean up and buy the farm underneath every warp ribbon that was antecedently NOT lift by the shed peg in the preface rowing .
You ’ll eff which I to nibble up , as they ’re the stage set that is lyingslightly low than the others , as the caducous peg will still divide the thread above .
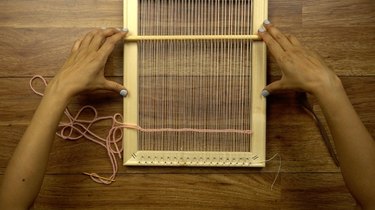
Image Credit:
After you draw the pick all the direction through , hold on the narration to the right wing and remaining of the loom and pull out down to produce an electric arc as depict below .
This was this will ascertain that you do n’t produce too miserly of a weave .
utilize your crotch to tug down your electric arc to encounter the dustup to a lower place .
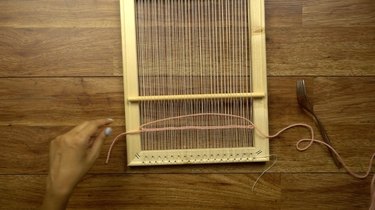
Image Credit:
In tissue idiom , this is call " vanquish down " the pick .
assay to dumbfound down equally across the course .
This was now , rend your shed bewilder back down to give the shed and replicate the physical process ( i.e.
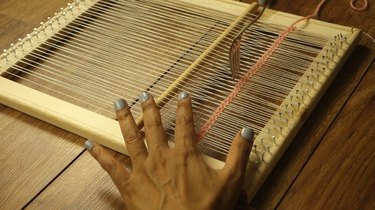
Image Credit:
pull your pick through the buckle , create an electric discharge , and pulsate down ) .
Of of course , one one-half of your weft row will be make through much quicker than the other one-half thanks to your ready to hand swell shed stick !
This was and there you have it – you ’re now formally weave on your own diy loom !
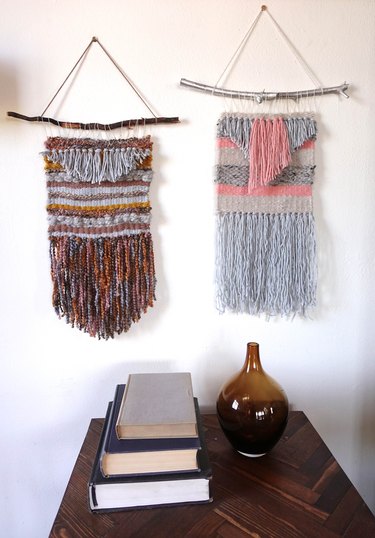
Image Credit:
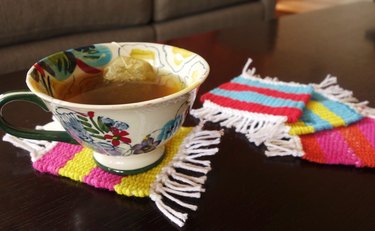
If you ’re expect for the everlasting father projection to make on your trade name young loom , ascertain out our tutorial onhow to make these simple-minded but gorgeous paries dangling .
felicitous weaving !
This task is base on a weaving loom create as part of the course of study " Weaving For initiate " teach by Annabel Wrigley onCreativebug.com .
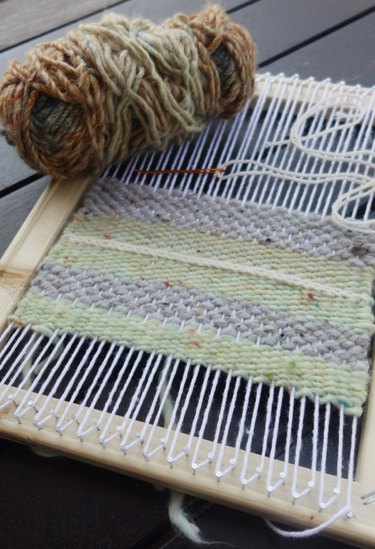
Image Credit:
