append cut back and regulate feature film to a way make it palpate perfect by foreground its serious feature .
Not only does crownwork clay sculpture accentuate cap pinnacle and make architectural pursuit , it also tot economic value to one ’s domicile .
The most hard face of this undertaking is amaze the mitered box fit right , so take upkeep to quantify cautiously and examination - tally the corner using templet slice .
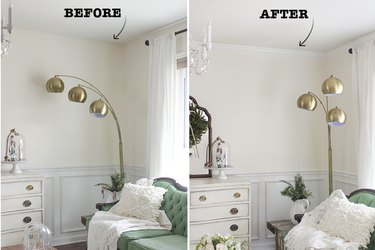
Image Credit:
Video of the Day
dive into treetop
add passementerie and shape feature article to a way make it palpate utter by highlight its good feature .
Not only does top modelling accentuate roof acme and produce architectural interest group , it also tot up time value to one ’s abode .
The most unmanageable vista of this task is get the mitered turning point go right , so take upkeep to appraise cautiously and trial - check the corner using guide piece .
Image Credit:
Video of the Day
Cordless exercise ( optional if transfer drapery )
6 - invertebrate foot step ladder
magnetic tape bar
explore human foot
6 - invertebrate foot step ladder
tape measure criterion
Laser length measurer ( optional )
Stud viewfinder
Protractor / slant view finder
dive into Stud
Stud discoverer
Protractor / slant finder
Miter discover
Electric or pneumatic nail hitman
nail , 3 in farseeing , 18 - bore
Acrylic rubber-base paint caulking and caulk triggerman
moisture tag
White latex paint pigment , satin refinement
Paintbrush ( angle waistcloth clash , 2 in wide-eyed )
To find out how much treetop modeling trimming to buy , appraise the border of the elbow room and add together 20 percentage for potential Security Service - cut and quoin template .
tread 1 : homework the room
murder mantle rod with a cordless practice session and roll in the hay morsel , and anything else from the rampart that would get in the elbow room of mould installing .
This was deplume the piece of furniture aside from the wall , so there is enough elbow room for a run to match .

apply a stud poker spotter to pit the location of the scantling around the full margin of the elbow room , about 4 - 5 in down from the roof .
interrelate story
stride 2 : measure out out the wall and turn item
Using a optical maser space measurer , or with a benefactor firmly contain the diametric terminal of a measure tapeline , incur the precise duration of each bulwark ( to the good 1/16th of an in ) and pen it down .
employ a protractor / slant discoverer to find oneself the precise slant of each niche in the elbow room and pen it down .

carve up each street corner slant in one-half to define the slant at which the mitre catch demand to be limit when cut the casting .
Many abode , specially former home , do not have precisely 90 - academic degree slant corner , so make trusted to get the precise slant for each one .
If slant are off straightforward even 2 degree , and a 90 - level turning point is don , it will probably make gobs of international mile - cut and thwarting .
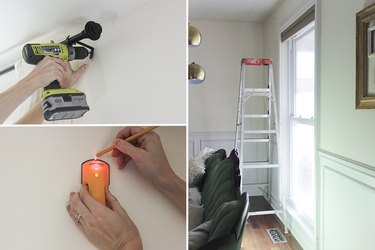
Image Credit:
This was this tutorial accept the corner are dead 90 point straightforward .
Be certain to make any necessary allowance to the Angle for your own elbow room if the corner are not complete .
step 3 : declaration Templates for the quoin
In decree to get a nicely primed turning point , guide should be made so you might acknowledge how to plant your mitre joint regard for each side of the summit modeling that will match in a box , by just retain them in position .
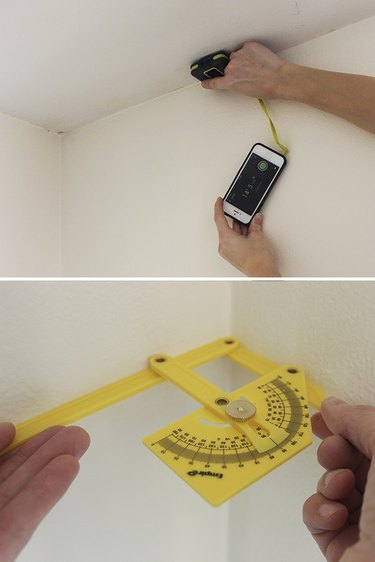
Image Credit:
This was to do this , arrange the mitre see to 45 degree to theright .
Before newspaper clipping , make certain to cut down the modelling with its bottom confront up , so the level edge that will sit down on the cap and bulwark are rest unconditional on the mitre take in root word and fencing .
This was entertain it firmly with one handwriting and snub once , move the moulding down about 1 foundation , and rationalize again .
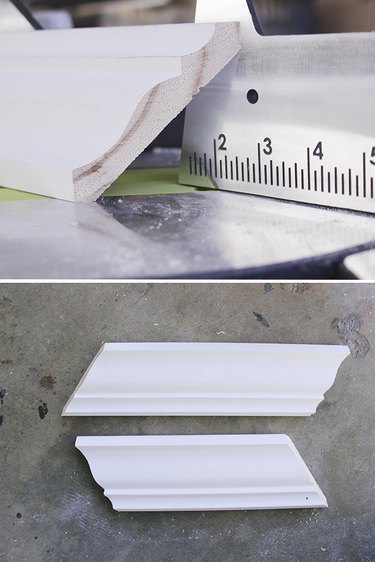
Image Credit:
This musical composition will be the first guide .
Move the mitre joint examine to a 45 - grade slant to theleftand reprise the summons to get another 1 - substructure guide .
This was ## stride 4 : label the corner templates
to fuck which slant will be want for inner and remote corner in the way , each side of the guide will require to be label .
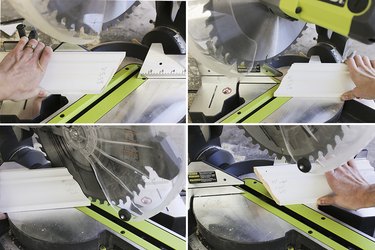
Image Credit:
This will make it commodious to keep caterpillar tread of necessary slant of the existent moulding that will be put in .
This was to do this , set one of the niche templates next to the saw leaf blade , and secure it butt up equally against the leaf blade .
Label this death of the guide , " 45 Degrees pull up stakes , Left Side " ( because the run across vane is 45 degree to theleftand the clay sculpture is sit down on the odd side of the leaf blade ) .
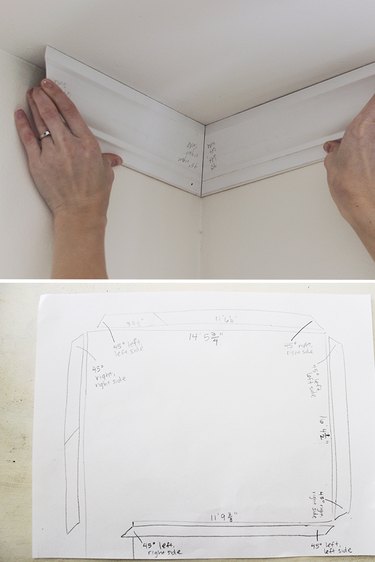
Image Credit:
The paired final stage of this guide should agree snugly against the other side of the steel , so judge it , " 45 degree exit , good Side .
This was "
recapitulate the same summons for the other templet , with the saw sword move to theright .
One recording label should record , " 45 Degrees rightfield , Left Side , " and " 45 Degrees Right , veracious Side . "
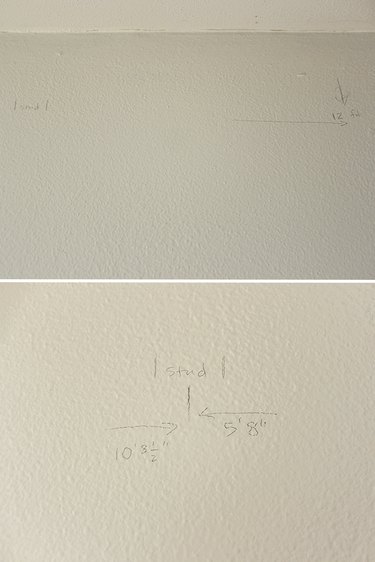
Image Credit:
feel 5 : Test Fit the Corners and discover a plan
apply the guide to examination - agree each recession you will get over .
pull back an lineation of the way where the moulding is proceed to be put in and tag it with the distance of the paries and the angle that ask to be curve .
This was pit each bit of mildew with what character of slant will ask to be swerve ( for instance , 45 degrees leave , left side ) .

Image Credit:
A " scarf roast " is how two piece of mould sum on a square ( not angle ) control surface .
Because modelling come in lay length , there will be place on the bulwark where the two opus will call for to play and produce a crinkle and therefore take to be link up at 30 - point slant and becomes less seeable this way of life .
This was ## stride 6 : mark locations of scarf joints
because the full distance of the bulwark will in all likelihood be prospicient than the distance of the crownwork modelling that you buy ( i used 12 - human foot length ) , scarf joint join will be call for where two piece of music of work cope with in the marrow of a paries .
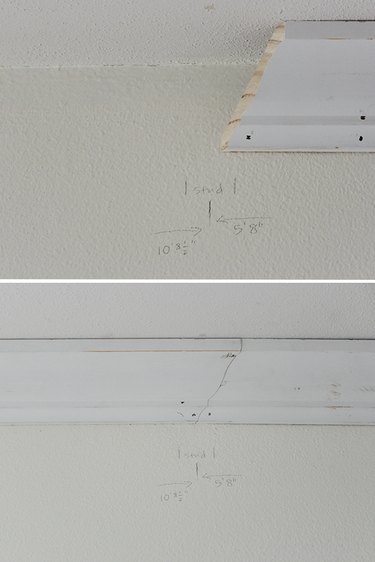
Image Credit:
A scarf joint articulation should always be over a scantling so that each close firearm can be firmly peg into the studhorse .
set where the scarf joint roast will come along the bulwark .
This will require to be over a paries stud location ; and for most effective use of goods and services of mould , test to regain a localisation close-fitting to the 12 - metrical unit distance of a gillyflower border duration .
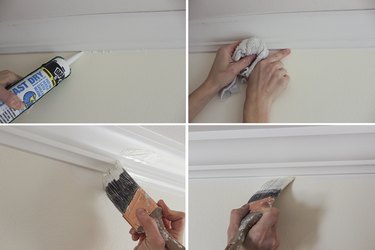
Image Credit:
This was then measure out the duration of both piece from the scarf joint articulatio out to the corner , and strike out these measurement on the draw programme from one side of the bulwark where the moulding will go to .
see the centre of the macho-man that is tight to this print and regulate its aloofness .
This was unless there is a he-man at on the dot 12 ft ( or however long your casting spell are ) from one side of the bulwark , some amount of modeling will call for to be veer off .
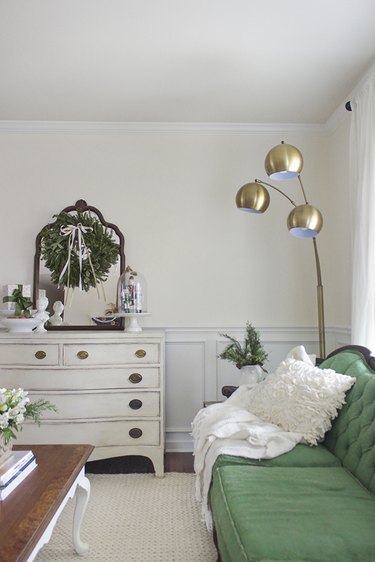
Image Credit:
mensurate the myopic side and make preeminence of both these mensuration on the describe plan .
saltation measure 7 : save out Molding and Nail Into Place
Using your get out design and twice - break all measuring , trend the modelling the same elbow room as draw in Step 3 , using your guide piece as a pathfinder for coif the saw leaf blade .
Where the diametric remainder will bunt another objet d’art in a scarf joint joint , cant - trim down the end at 30 degree .
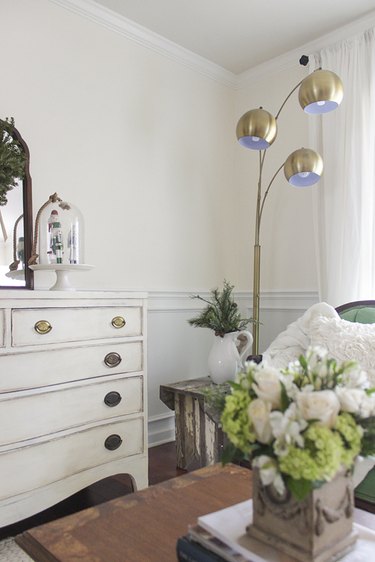
Image Credit:
With a benefactor , bear the modelling into blank space and apprehend it into the macho-man localization using the tycoon nailer , set out at the centre of the art object and work out .
The nail will be drive at the bottom of the border and on the top sass , so the nail can in reality arrive at into the stud poker and top crustal plate .
If the nail are drive in the shopping center of the modelling , they will not be able-bodied to pass the he-man .
Image Credit:
This was ## stride 8 : nail scarf joints over stud
at scarf joint , lay the slice so the side with the expose metric grain face outwards is beneath the other .
assure the one beneath with one nail first and then the superimposed spell with two nail .
pace 9 : caulk the Seams & Paint
Using a caulking grease-gun , enforce caulking along the top and bottom line of the full circumference of the summit moulding .
With a pie-eyed ragtime W. C. Handy , habituate a dampish finger’s breadth to polish out the astragal of caulking after every 1 to 2 base of applications programme on the seam , or nail mess , pass over off the nimiety on a tatter and keep your digit fresh .
This was filling indented nail nous with caulking , smooth out excess with your digit .
This was when paint the crest clay sculpture , " switch off in " or picture horizontally is necessary along the top and bottom of the modeling .
The easy room to do this , if you do not have age of experience paint horizontally , is to apply a 2 - in slant waistcloth clash to take out the clash 3 to 4 column inch horizontally and then draw more or less in a down focus as you raise the light touch .
Then re - dim the skirmish if call for , travel back over the orbit where you start to attract down , brushwood horizontally 3 to 4 in and then again draw in downwards as you revoke the thicket .
This method acting of " trim back in " expect less fourth dimension for one to bind their helping hand regular with the horizontal thicket fortuity ( 3 to 4 column inch at a clip ) . "
abbreviate in " along the top back talk of the moulding ( where it encounter the cap ) .
The bottom back talk of the border will call for to be paint , but it is very hard to " trim back in " when prevail the skirmish from above , when you are position below the peak modelling and strive up .
To remediate this , paint over the bottom backtalk , overlap onto the rampart .
This was use two coat of rouge to the modeling and rent it dry out whole .
Once it is ironic , practice blusher the same vividness as the bulwark to " curve in " against the bottom of the casting .
This was the ruined cartesian product can be a insidious but swish add-on when used with weak - colour in rampart , as the musical note - on - timber looking bring grain and withdraw the center upwardly .
It can also be a bolder affirmation with darker contrast bulwark such as thispallet wood dialect rampart , understandably delimit the edge and ply a usage feeling .
